Difference between revisions of "Manual:Introduction"
(Added variables view) |
(→Variables: layout picture like other pictures) |
||
| Line 128: | Line 128: | ||
It'll then appear in the Variables view, like so: | It'll then appear in the Variables view, like so: | ||
| − | [[File:Variables_view.png]] | + | [[File:Variables_view.png|border|center|800px|]] |
{{note|The variables view doesn't autoupdate, but it can be refreshed by clicking the Variables button.}} | {{note|The variables view doesn't autoupdate, but it can be refreshed by clicking the Variables button.}} | ||
Revision as of 12:37, 7 October 2014
Automation and MUD Rules
Effectively speaking, it is possible to create an AI (Artificial Intelligence) that does everything you can do in a MUD. Even more so, the program will be able outperform you in almost every routine operation. The difficulty of creating such a program depends on the task it has to perform: gathering loot being very easy, walking through a dungeon and leveling you character being moderately easy and socially interacting with other real people being outrageously difficult (see A.L.I.C.E.). At the end of the day, you’re teaching your client to process information and act the way you consider best suited. Because scripting is so powerful, it can give you a competitive advantage that some people consider unfair or even cheating. As of the moment of this writing (2 November 2008), this sort of automation can be best observed in commercial massively-multiplayer online role-playing games (MMORPG), known as gold-farming or power-leveling. The basic idea is creating a system that will raise your character to the maximum level and gather in-game currency in the process, both of which can be effectively exchanged for real-world currency. The spread of the above aspects can have much more far reaching consequences than just being unfair, such as inflation, loss of balance in terms of game-mechanics or, ultimately, a complete crash of in-game economy. For more information see the paper "Simple Economics of Real-Money Trading in Online Games" by Jun-Sok Huhh of the Seoul National University. For these and various other reasons the administrators and owners of the corresponding virtual worlds can forbid the usage of automation tools. A failure to comply can result in suspension or deletion of the user’s character or account for future denial of service. By including scripting support in Mudlet, we effectively give you the ability to create and utilize AI toolkits, however, we do not endorse or promote the usage of these systems if it’s prohibited in your MUD. Keep in mind that by cheating you can lessen the quality of gameplay for both your fellow players and yourself.
Mudlet's Automation Features
Mudlet offers a vast array of standard features to automate or otherwise improve your gaming experience. These include, but are not limited to:
- #Aliases
- User-defined text input, which is converted into a different, usually longer input before being sent to the MUD.
- e.g. typing gg to have get gold from ground;put gold in bag be sent to the game.
- #Keybindings
- also known as hotkeys, allow executing certain user-defined commands by simultaneously pressing a specific combination of keys
- e.g. pressing CTRL+H to send "say Hello Miyuki!" to the MUD or play La Marseillaise
- #Triggers
- execute user-defined commands upon receiving specific out from the MUD,
- e.g. MUD sends: "You see Elyssa standing here." and Mudlet automatically sends "poke Elyssa" to the MUD.
- #Timers
- delay the execution of a command or execute it after a specified period of time.
- e.g. throw gauntlet to Eric-wait 3 seconds-exclaim Let us end this here!
- #Variables
- allow the user to store text or numbers for easier use inside scripts.
- #Events
- allow the user to make triggers for specific events like when Mudlet has connected to the MUD, or even user-defined events to use in complex system making.
To get started on programming in Mudlet, watch these screencasts that explain the basics - that'll help you get the basics.
Keep on reading for an introduction to Mudlet's features:
Aliases
Aliases are the most basic way of automating the gameplay - you can use aliases to shorten the amount of typing you do. See more detailed info here: Manual:Alias Engine
Example - Brew’o'Matic 6000
You’re walking around the epic dungeon of the Unholy Firedragon of Westersand, gathering roots in order to brew a potion and thus restore the growth of hair on Farmer Benedict’s bald head. Once you see a root, you need to:
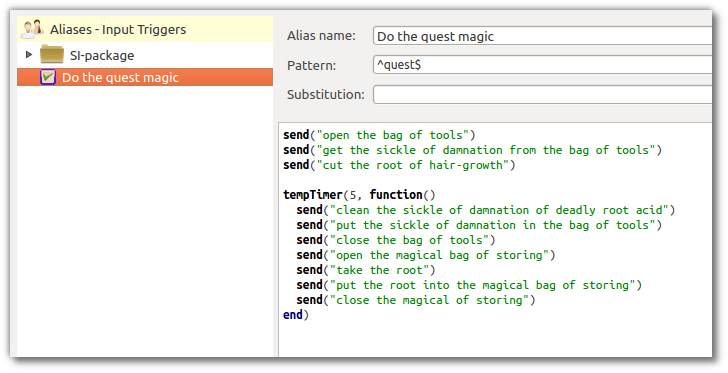
<lua> open the bag of tools get the sickle of damnation from the bag of tools cut the root of hair-growth <wait 5 seconds> clean the sickle of damnation of deadly root acid put the sickle of damnation in the bag of tools close the bag of tools open the magical bag of storing take the root put the root into the magical bag of storing close the magical of storing </lua>
And once you’re done, do the exact same thing nine more times… thrice a day!
Alternatively, you just create an alias that would do this all with a single command - for example, "quest". To make that happen, read on! Here's a sneak peek on what you should have in the end:
Making an Alias
To get started, go click on the Aliases button in Mudlet, and then on the Add one. This will make a blank alias for you, which we’ll now fill in.
The Alias name field is optional - it’s mainly used for the alias listing that you see on the left as an easy way to distinguish all of the aliases. You can just name our alias "test" for now. The Pattern field is where you put your regex pattern to describe the command you'll enter to make your new alias spring into action. Let’s say we want our new alias to send the command "say hello" whenever we type "sh". The regex pattern would be ^sh$. Then we put say hello into the Substitution field. After you have saved and activated your new alias "test", whenever you type "sh" Mudlet will not send "sh", but "say hello" instead. We call this substitution process alias expansion.
Mudlet uses Perl regular expression aliases. Regexes are a special way of matching patterns of words. For the beginners it is enough to think of them as a general way to specify the words itself and their placement within the line. For basic aliases it is enough to know that the character ^ symbolizes the beginning of the line and the character $ symbolizes the end of the line. If you want to make an alias "tw" that sends the command "take weapon", you don’t have to care about placement or pattern matching in general. All you need to do is fill ^tw$ in the field called "Regex" and type take weapon in the field called "substitution". Then you need to save the new alias by clicking on the "Save" icon in the top middle. The symbol for unsaved items disappears and makes way for a little blue checkbox. If this box is checked the alias is active. If the blue box is empty, the alias is deactivated and will not work unless you press the "activate" toggle padlock icon. Now you are ready to go. Type "tw" in the command line and press the enter key. Mudlet will send "take weapon" to the MUD. Aliases are basically a feature to save you a bit of typing (much like buttons which will be described in detail in a later section of the manual). More advance alias usage will be described later in the manual.
Making a Targetting Alias
To make an alias that'll remember your target - making it easier to use your skills and saving you the hassle of typing the target in all the time, do the following:
In the Pattern field, place the following:
^t (.+)$
That will match all commands that you type in the format of t <any words> - it'll match t rat, t tsol'aa, t human and etcetera.
Next, make the big box do this:
<lua> target = matches[2] cecho("<light_slate_blue>My target is now: <red>"..target.."\n") </lua>
You can also make an alias with an optional target:
^dd(?: (.+))?$
Now the target, if it is supplied, is going to be matches[2]. You can test if the target was given with this code:
<lua> send("cast spell at "..(matches[2] or target)) </lua>
That's it - whenever you use this alias, your target will be remembered in the target variable.
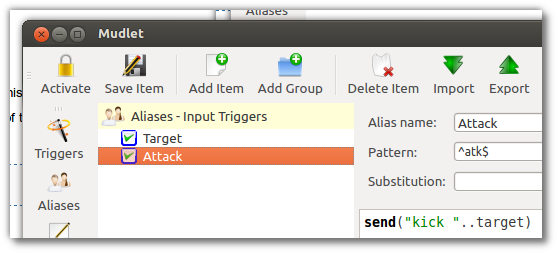
Next, you'd like to make use of this variable - so make another alias that will do the actual attacking for you! Here's an example one:
Pattern:
^atk$
Code:
<lua> send("kick "..target) </lua>
This alias will kick the target when you type in atk. Feel free to adjust the "trigger" word and the command as you need them.
Variables
Variables are containers for data. In Lua, they can store numbers or words. You can use variables to store important information like how much gold do you have, or have them remember things for you.
The syntax for making a variable remember a number is the following - create them in the Script editor in a new script: <lua>variable = 1234</lua>
Or to make it remember some text: <lua>my_name = "Bob"</lua>
It'll then appear in the Variables view, like so:
You can also do basic maths easily, for example:
To concatenate strings together, you can use the .. expression: <lua>my_full_name = "Bob" .. " the Builder"</lua>
Don't forget to use a space when you're concatenating two variables together: <lua> firstname = "Apple" lastname = "Red"
-- bad: will produce "AppleRed" full_name = firstname .. lastname
-- good: will produce "Apple Red" full_name = firstname .. " " .. lastname </lua>
You can also edit and delete variables from the variables view. Be careful when changing or deleting existing variables made by third-party scripts - you might break them. If that happens, re-opening the profiles will restore the variables back to working order.
While you can create variables in the Variables view, remember that they won't be saved when Mudlet shuts down - if you'd like them to be more permanent, create scripts with the variables instead.
Sending Commands to the MUD
To send a command to the MUD, you can use the send() function. Data inside the quotes is sent to the MUD.
For example, the following code sends the command to eat bread: <lua>send("eat bread")</lua>
If you’d like to include variables in the send command, you need to prefix and suffix them with two dots outside the quotes, like this: <lua>send("My name is " .. full_name .. ". What's yours?")</lua>
If your commands ends with a variable, you don't need the two dots after: <lua>send("Hi, my name is " .. character)</lua>
Another useful tidbit - should you want to include doublequotes " in your send(), replace the quotes with and signs: <lua>send(say "Hi, I'm new here!")</lua>
When inserting a variable, you'd use the ]] and [[ appropriately: <lua>send(poke ..victim)</lua>
Showing text on screen
To echo (show text to yourself) you can use the echo() or the insertText() function. For example, the following code will display "Time to eat dinner!" on your screen:
<lua>echo("Time to eat dinner!")</lua>
If you’d like to include variables in your echo, you concatenate (put together) the value of your variable to the text: <lua> my_gold = 5 echo("I have " .. my_gold .. " pieces of gold!\n") </lua>
If you'd like to include a new line in your text, insert \n for it:
<lua> echo("this echo\nis on\nthree lines!")
-- comes out at: this echo is on three lines! </lua>
Seeing errors in your code
Undoubtedly you'll be making mistakes when you're coding! To err is human, after all. There are two types of mistakes you can make in general: when the words you've typed in make no sense to Lua at all, or they do make sense, but they don't do what you actually thought and intended them to do - or other circumstances are preventing it from working at that point in time.
Syntax errors aka Ladybugs
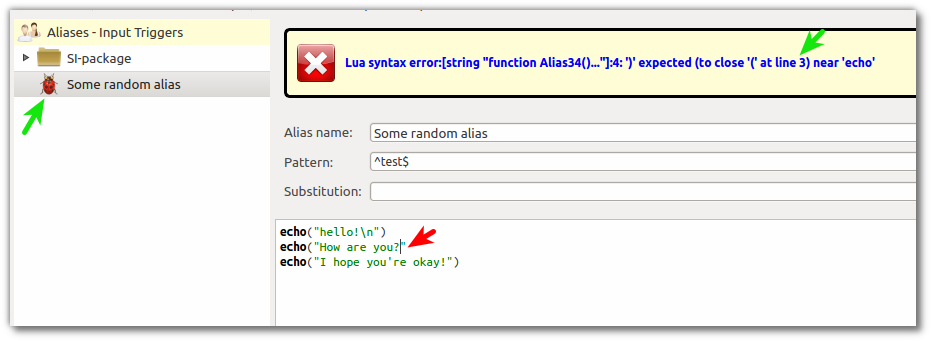
When you type something in that doesn't make sense to Lua, it's called a syntax mistake (or error). Mudlet will realize this and show you a little ladybug, and also tell you on which line the mistake is. Here's an example:
The echo() function on line 3 is missing a closing bracket - every bracket in Lua that's not green needs to be closed. Mudlet showed you a ladybug symbol on the alias, to indicate that the alias has a problem. It also showed you that the ( bracket should be closed on line 3. To fix this, you'd add the ), save, and it will be all happy.
Runtime errors aka Errors View
Another type of mistake is when what you typed in makes sense to Lua when you typed it in, but when it's time for code to be actually run, something wrong happens. For example, you asked Lua to eecho("hey!") - this is valid, you typed it in right, but there is one problem - eecho doesn't exist. So when you run the alias, nothing actually happens. Why?
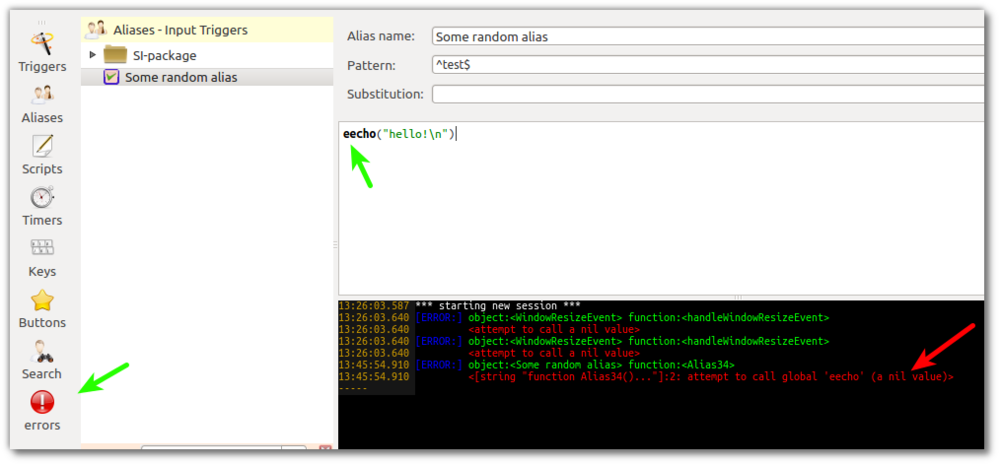
Mudlet puts all problems that happen when things are run (runtime errors) into the Errors view. It is hidden by default, open it by pressing the errors button that you see on bottom-left. This is where the error is logged at - not your main window, so you aren't spammed when you make a mistake in a piece of code that happens very often.
Opening it up will yield is this:
Let's analyse the message that's shown to us. object:<Some random alias> means that the Mudlet name you gave to the thing that had a problem is Some random alias - which is, indeed, our alias. function will tell you Alias, Trigger, Script or something else - this helps you locate the problematic item in question.
Next red line is the actual error: it's saying that on line 2 (it's off by one - so actually line 1), eecho is a nil value. In Lua, nil means doesn't exist. Hence what it's telling you is that eecho does not actually exist! Change it to echo, run it again, and there will be happiness.
That's it for now - this page in time will be improved with common techniques you can use to diagnose errors quickly, etc... if you know anything about this, feel free to add it here!
Triggers
Triggers are an automation feature offered in all MUD clients. They help you respond quicker a particular situation and generally make things more convenient for you since you need to do less manual work as your triggers will do the hard work for you often times. This helps you concentrate more on the important aspects of the game and lessen stress. The way a trigger works is simple: You define some text that you want to trigger some action. This is called the trigger pattern. When the trigger "sees" this text in the MUD output, it’ll run the commands you’ve told it to. Example: Whenever you see a bunny, you want to attack it (meanie!). You type "bunny" in the data field titled "add to list" and then either press the enter key or click on the little + icon next to the input line to add this word to the list of texts this trigger fires on. Now you type "kill bunny" in the field called "send plain text". Then click on the save icon to save the trigger and activate your new trigger (= blue checkbox icon in front of the trigger name in the trigger tree on the right side is checked). When the trigger is active each time the word "bunny" will appear in the MUD output, your trigger will issue the command "kill bunny" automatically as long as it is active. When you want to stop hunting bunnies, you can simply select the bunny trigger and then click on the padlock icon to deactivate the trigger. The trigger will stop firing until you re-enable it again via the padlock icon. If you lock a group of triggers or an entire trigger branch, all triggers in this branch will be locked until you remove the lock again. The locking starts from the root of the tree down to the end. As soon as a lock is met the trigger engine will skip the locked branch. Locking and unlocking branches is one of the most common actions you have to take care of when playing. You turn on your defensive triggers when engaging into a battle and you turn them off afterwards, or you turn on your harvesting triggers only when you are going to harvest.
Beginners should use Mudlet's automated highlight triggers in the beginning to highlight the text that has been triggered on to get the hang of the different trigger and pattern types. Click on the "highlight trigger" option and pick a foreground and a background color that you like to highlight your trigger with. When the trigger matches it automatically highlights its pattern. This is the most used form of triggers in mudding as it is a quick way of highlighting words that are important to you at the moment. You don’t have to know anything about scripting, regular expressions etc. to use highlight triggers. Just type in the word you like to be highlighted, select appropriate colors, save the new trigger and activate it.
Matching one unknown
You can also set up a trigger to gather the scimitars, gold or whatever the skeletons could carry around with them. Since we do not know what the loot is, we will need to set up a trigger to match the line and take whatever was dropped. Examples:
The skeleton drops ring. The skeleton drops gold. The skeleton drops scimitar.
The skeleton drops_ is the generic segment of the line, the loot itself varies. Thus, we need to tell the client to take_ whatever the skeleton dropped. We do this by setting up a so-called regular expression:
perl regex type pattern: <lua>^The skeleton drops (.*)\.$</lua>
Script: <lua>send("take " .. matches[2])</lua>
The expression (.*) matches any characters that the client receives between The skeleton drops_ (NB: notice the blank at the end) and the full-stop. matches[2] simply transfers the first matched text fitting the search criteria into the output (matches[1] contains the entire matched text, matches[2] contains the first capture group. More on this in section two of the manual).
Matching multiple unknowns
Now, let’s try making a trigger that would gather the loot from anybody:
perl regex type pattern: ^(.*) drops (.*)\.$
Script: <lua>send("take " .. matches[3])</lua>
In this case, any time somebody, or something, drops something else, or someone else, the client will pick it up. Note that we used matches[3] instead of matches[2] this time, in order to pick up the second match. If we used matches[2], we’d end up picking up the skeleton’s corpse.
Matching known variants
If you’re playing a MUD in English, you’ll notice that these triggers probably won’t work due to English syntax. Compare:
 The skeleton drops apple.
 The skeleton drops an apple.
Chances are that you’ll see the later a little more often. If we used our old RegEx, the output would look something like this.
 INPUT: The skeleton drops an apple.
 OUTPUT: take an apple
Most MUDs can’t handle determiners, such as articles (i.e. a, an, the) or quantifiers (e.g. five, some, each), in user-input. To match this line we could either create multiple triggers matching every possible article or a regular expression filtering out these words:
Perl Style Regular Expression: (.*) drops (a|an|the|some|a couple of|a few|) (.*)\.$
Script: <lua>send("take " .. matches[4])</lua>
Once again, note that we’re using the third match (matches[4]) this time.
![]() Note: Certain other languages, with a morphology richer than that of English, might require a somewhat different approach. If you’re stuck, and your MUD-administrators don’t prohibit the use of triggers, try asking on the corresponding world’s forums.
Note: Certain other languages, with a morphology richer than that of English, might require a somewhat different approach. If you’re stuck, and your MUD-administrators don’t prohibit the use of triggers, try asking on the corresponding world’s forums.
For more information, see the chapter Regular Expressions.
Basic Regex Characters
Retrieving wildcards from triggers
Wildcards from triggers are stored in the matches[] table. The first wildcard goes into matches[2], second into matches[3], and so on, for however many wildcards do you have in your trigger.
For example, you’d like to say out loud how much gold did you pick up from a slain monster. The message that you get when you pick up the gold is the following:
You pick up 16 gold.
A trigger that matches this pattern could be the following:
Perl Style Regular Expression: ^You pick up (\d+) gold\.$
And in your code, the variables matches[2] will contain the amount of gold you picked up (in this case, 16). So now to say out loud how much gold did you loot, you can do the following:
Script: <lua>echo("I got " .. matches[2] .. " gold!")</lua> More advanced example Here’s an example by Heiko, which makes you talk like Yoda:
Perl Style Regular Expression: ^say (\w+) *(\w*) .*?(.*)
Script: <lua>send( "say "..matches[4].." "..matches[2].." "..matches[3] )</lua>
What it does here is save the first word, the second word and then the rest of the text into wildcards. It then says rest of the text first, then the first word and then the second word.
Highlighting Words
To highlight something in the MUD output, make a trigger and use the "highlight trigger" option to highlight the matched trigger pattern.
Optionally, you can also make use of the bg() and fg() functions in scripting to highlight.
Keybindings
Keybindings, or hotkeys, are in many respects very similar to aliases, however, instead of typing in what you want to be done, you simply hit a key (or combination of keys) and let the Mudlet do the work.
Example - You don’t drink tea, you sip it! You’re participating in an in-game tea sipping contest. The winner is the first person to sip an Earl Grey, should the quiz-master make a vague reference to a series of tubes, or a Ceylon Mint, if he begins talking about the specific theory of relativity. In order to give us a competitive advantage, we will define two keybindings:
HOTKEY: F1 command on button down: sip earl gray
HOTKEY: F2 command on button down: sip ceylon mint Now you just have to listen, or rather read, carefully and hit either F1 or F2 to claim that prize.
Another practical use for keybindings would be creating a so-called "targeting system", which is especially useful for grinding down armies of pumpkin-men in MUDs without auto-attack. See the Variables chapter for further details.
Instructions on how to make a keybinding can be found here: Keybindings
Timers
Timers, as the name suggests, can be used to execute a specific command at a certain time, after a certain time or once every so often. To use a simple timer that does something after a period in your script, use this:
<lua> tempTimer(seconds, code) </lua>
Seconds can be a decimal, so 0.5 for half a second, or 1 for a full second will do. Here's an example:
<lua> -- this timer goes off 2 seconds after it was made tempTimer(2, echo("hello!\n") ) </lua>
All timers that are made at once fire from the common point in time, not relative to each other - so if you want to make one timer go off after 1 seconds, and another after 2 seconds, don't do this:
<lua> -- incorrect: tempTimer(1, echo("hello!\n") ) tempTimer(1, echo("how are you?\n") ) </lua>
Both of these timers will go off at once, because both started together, right away! Instead, do this:
<lua> -- correct: tempTimer(1, echo("hello!\n") ) tempTimer(2, echo("how are you?\n") ) </lua>
That's it for the basics of scriptable timers in Mudlet. Want to know more? See here for a full description of timers in Mudlet.
Buttons
You can use Mudlet to create simple buttons on your screen without much coding at all - you can attach button bars to the top, left or right side of the screen. Each of these locations can contain an infinite number of button bars that are shown when active or hidden when inactive. You can also create drop-down menus or or two-state buttons - ones that you can click on and they stay pressed down.
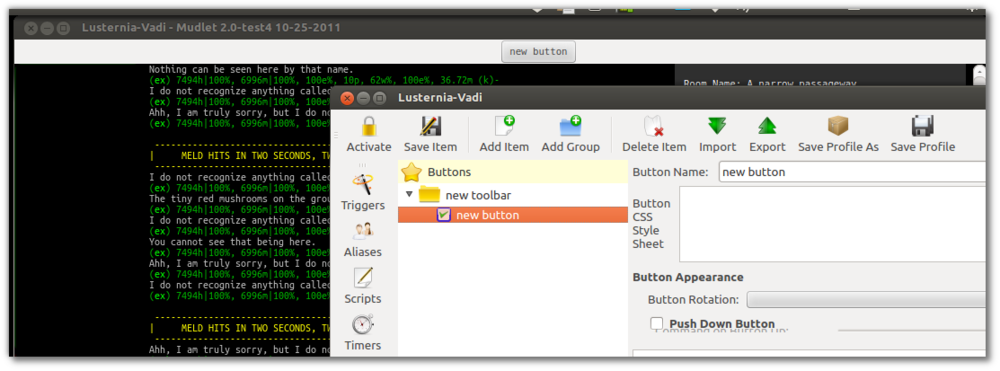
To get started with buttons, make a group (buttons have to be in a group to show) and add buttons inside them. Active buttons or groups to make them be visible. Here's an example - by making a new group and a button inside it, and activating both, we got a button to spawn:
Buttons show in the order they appear in - so if you'd like one button to be above another, just drag it visually in the editor!
Menus
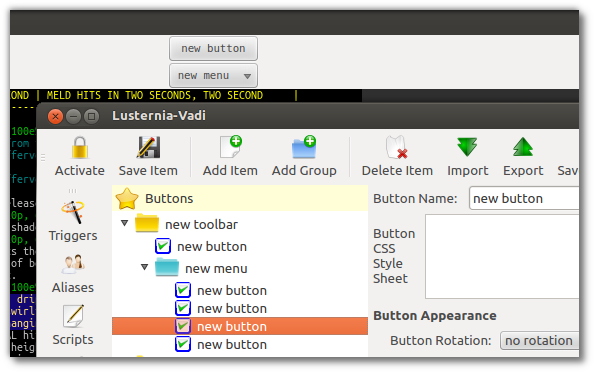
An important use case for buttons is to have various menus which contain a number of checkbox buttons or sub menus in order to quickly set various scripting configuration or other options in your scripts. To start a menu of buttons, create another group inside your toolbar group and add individual buttons inside it, like so:
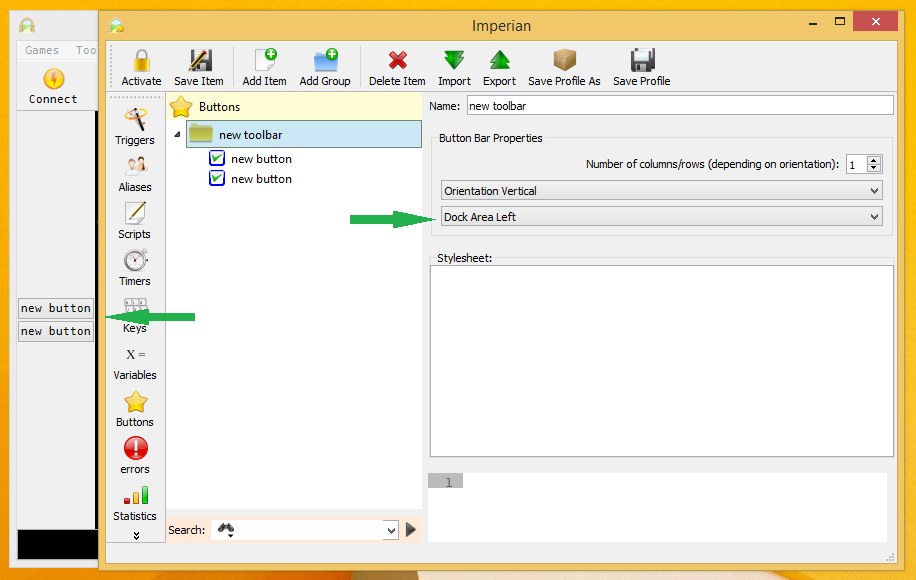
To change the side of Mudlet that the buttons use, change the Dock area <side> option and save. You can also make buttons align themselves top to bottom or left to right with the Orientation <horizontal or vertical> option.
Making buttons do stuff
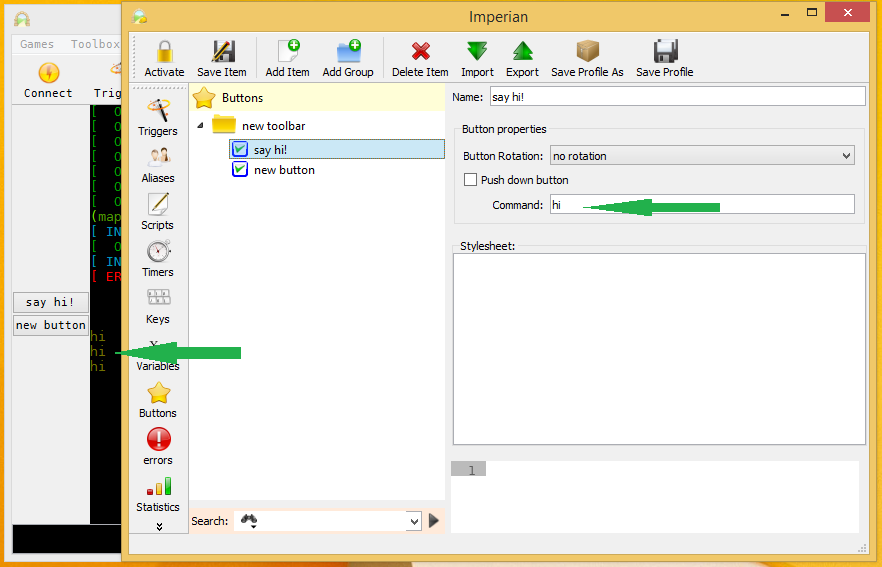
Buttons are half as useful only being there. You can also make them do commands for you for when you press them! To make a button do your command, or alias, or anything - type it into the Command on Button Down field. Pressing the button will do that command then:
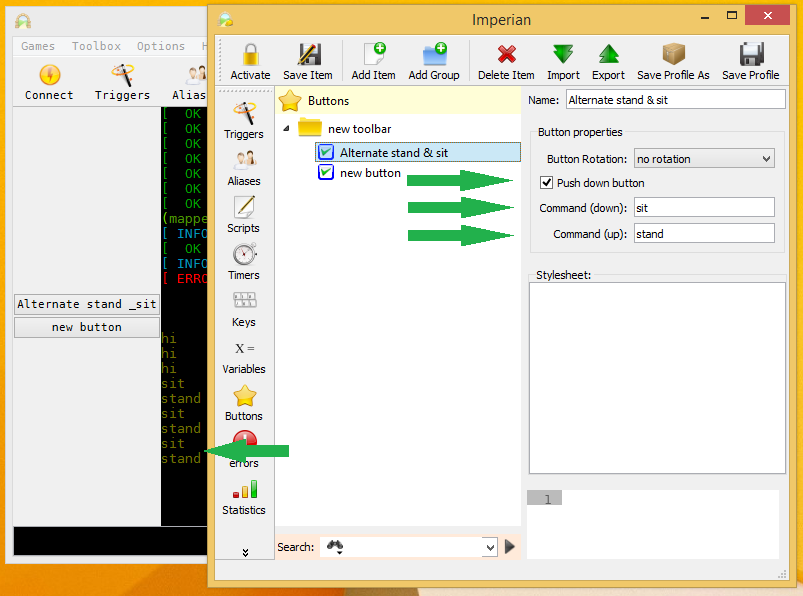
You can also make a button do two things, toggling between each. To do that, enable the Push Down Button option, and type the command you'd like your button to do when it's released in the Command on Button Up field.
![]() Note: If you'd like to include & in the button name, put double && - a single & will act as a mnemonic to underline the shortcut letter.
Note: If you'd like to include & in the button name, put double && - a single & will act as a mnemonic to underline the shortcut letter.
Colouring & customizing buttons
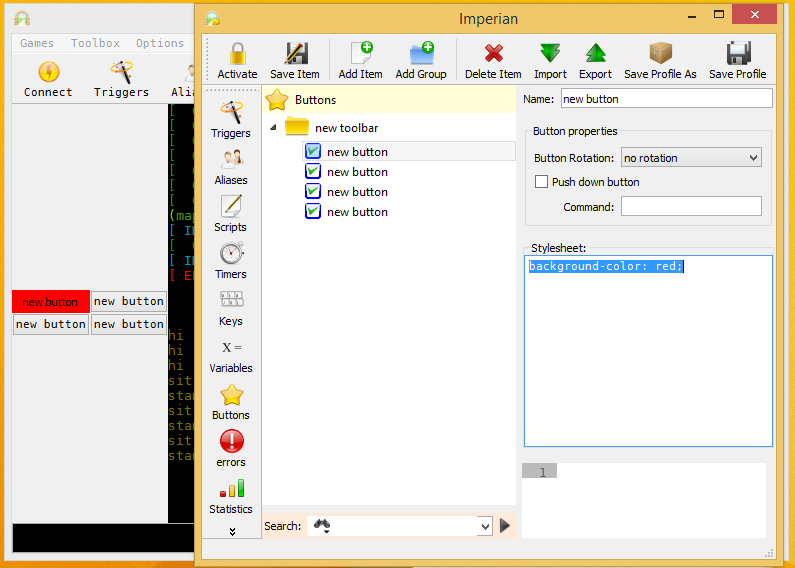
To change how your buttons look, you put descriptions into the CSS Style Sheet field, in the format of <a word describing something>: <how it should look>;. For example, if you'd like to make the button be red, put background-color: red; into the CSS box:
A full list of names you can use to customize your buttons view is available here. Take note of how that page has the descriptions inside {} brackets - you don't need them, only paste what's inside them in Mudlet.
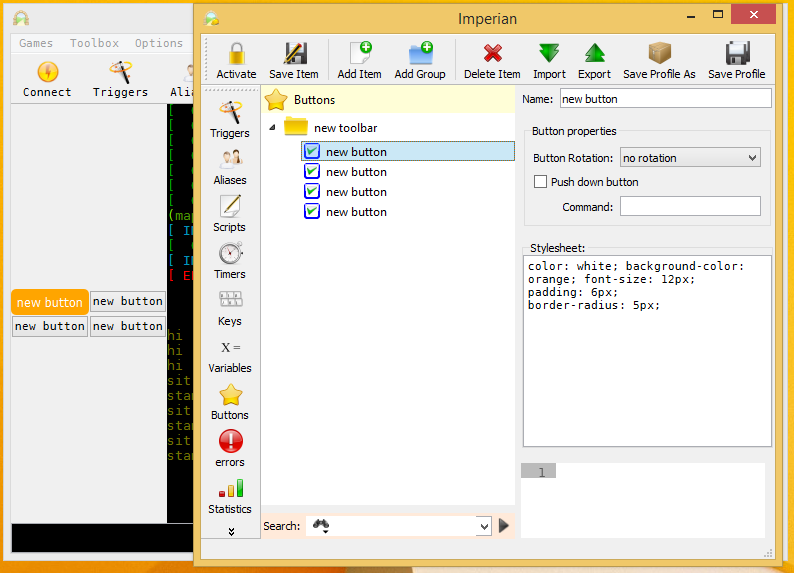
Applying some skills, we can make our buttons look much more aesthetic:
This was the code used, feel free to start your buttons off with it:
<lua> color: white; background-color: orange; font-size: 12px; padding: 6px; border-radius: 5px; </lua>
Managed layouts
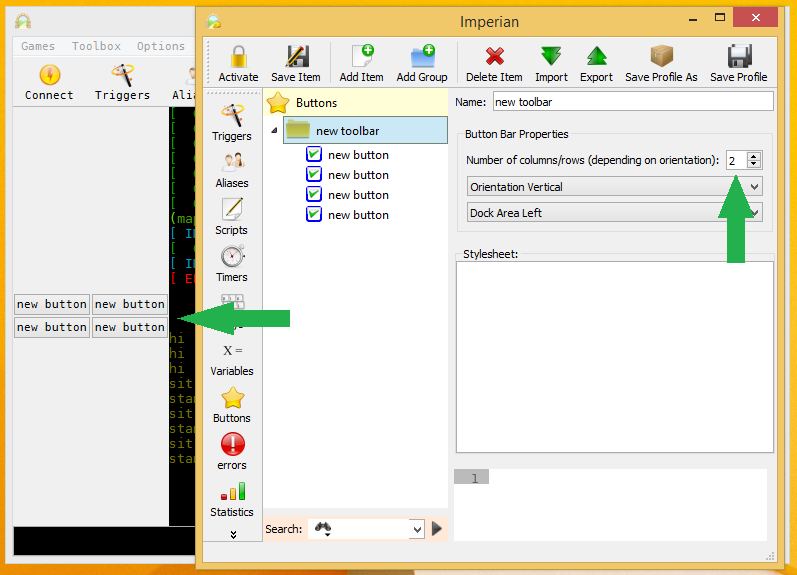
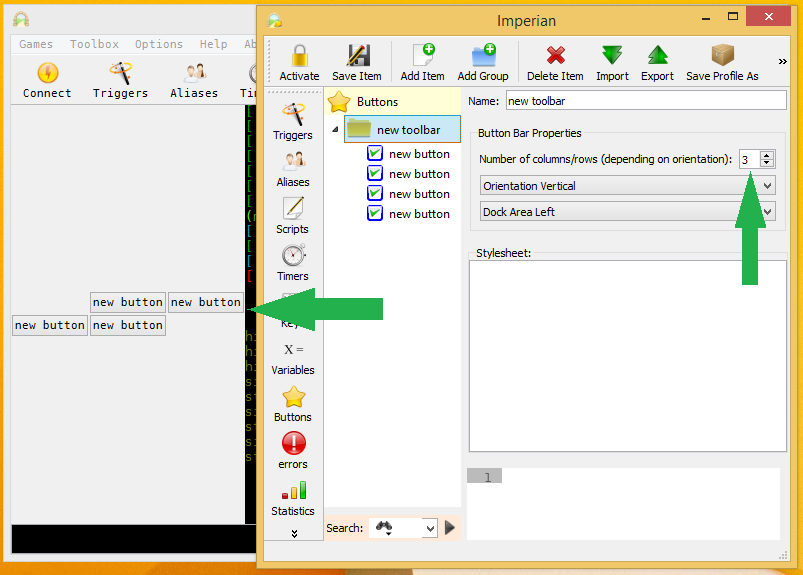
To get your buttons to align into rows or columns (that depends on their orientation), add a number to the Number of columns or rows field. Here's an example with two columns on the left:
Here's another example with three columns on the left:
![]() Note: You can change how your buttons are aligned within rows by clicking on the button group - it will cycle through different possible configurations for you.
Note: You can change how your buttons are aligned within rows by clicking on the button group - it will cycle through different possible configurations for you.
Misc Examples
Here are some more miscellaneous examples.
Mud syntax: get coins from corpse and also get coins from corpse 3. Alias Pattern: ^gcc(?:\s(\d+))?$ (can accept simply gcc and also gcc 3 for example). <lua> send("get coins from corpse " .. (matches[2] or "") ) </lua>
Mud syntax: unlock northwest with steel key Alias Pattern: ^un (\w+) (.*)$ <lua> send("unlock " .. matches[2] .. " with " .. matches[3] ) </lua>
See also: Mudlet Technical Manual
